Enjoy!!! :D
Monday, 30 August 2010
Saturday, 28 August 2010
Day 54: Building Basics Part 4 - Flexible Path
Okay so now I am guessing you know how to use the General and Object Tab, so now we are going to have a bit of fun and play around with our prim :P
So get out your cube and lets begin!
1) The Facts!
Okay so here are some facts you should know about flexible prims, you can only make 3 shapes flexi, they are the cube, cylinder and the prism.
Also you can not physically attach anything to the flexible end of the prim, only the side that isn't flexi.
The most common places you will find flexi prims in Second Life is on Hair, Skirts and flags.
So got the facts? Now lets get down and have some fun :P
To make it fun, we are going to create a flag and we are going to use some maybe new and old techniques to create it!
2) Creating The Pole
So when you have rezzed your prim, go in to the general tab and name it "Flag Pole".
Next go into your object tab and go into the shape dropdown menu and select cylinder, this will change the shape of your prim.
Now we need it to look more like a flag pole, so type in these values in the size:
X=0.20
Y=0.20
Z=4.00
 Now click on the box which has Texture written underneath and click Blank, this will make the wood texture dissapear and leave you with a solid grey pole. We now want our pole to look more "metal", so we are going click on the drop down of shininess and choose high.We have now done our pole and are now going to create the flag!
3) Creating The Flag
So to create the flag, we are going to copy our pole and then edit it, so here is how you copy and position it back to its last position...
Now in the Object Tab change the shape to box and put in these values:
Rotation:
X=0.00
Y=90.00
Z=0.00
 Now when you have created its shape, go into the Texture tab (this is where you can use your imagination :P) and choice absolutly any texture/color you want to use for the flag! I used the one in the library folder called Fabric - tie dye.
Softness:3.000
Maximum is 3, minimum is 0. It is basically the thickness of the prim, and as a flag is very soft, it is best at 3!
Gravity:0.000
Maximum is 10, minimum is -10. This is how much it is pulled upwards or downwards. (Minus numbers pull up, positive numbers pull down)
Drag:0.0
Maximum is 10, minimum is 0. This is basically how long for does the prim drag along before it reaches back to its relevant position (the higher the slower, the lower the quicker)
Wind:10.0
Maximum is 10, minimum is 0. If you want the wind to have an effect on whether the flexible prim moves then the higher the better. If you want the wind to have no effect on it (say if you are wearing a short skirt :P) you would probably want it to low or 0
Tension:5.0
Maximum is 10, minimum is 0. How quick do you want the flag to react to the wind/movement? Well this is what Tension predicts, it also helps control the speed!
The faster you want it, the higher the value! The slower you want it... (you can guess the rest :P)
Force x:0.00
Force Y:0.00
Force Z:0.00
Maximum is 10, minimum is -10. These control in which way you want it to have the most effect, so by tweaking and experimenting with each one you could get some pretty cool effects.
So now you have your flag and you will finally need to link it, so click on any (it doesn't matter which is root) and then hold shift and click on the other, then click Ctrl L, now you will have your flag! Name it what you want then take it into your inventory :)
I hope this tutorial was helpful, if you have any problems or get stuck or confused just leave a comment and I will get back to you asap!
So get out your cube and lets begin!
1) The Facts!
Okay so here are some facts you should know about flexible prims, you can only make 3 shapes flexi, they are the cube, cylinder and the prism.
Also you can not physically attach anything to the flexible end of the prim, only the side that isn't flexi.
The most common places you will find flexi prims in Second Life is on Hair, Skirts and flags.
So got the facts? Now lets get down and have some fun :P
To make it fun, we are going to create a flag and we are going to use some maybe new and old techniques to create it!
2) Creating The Pole
So when you have rezzed your prim, go in to the general tab and name it "Flag Pole".
Next go into your object tab and go into the shape dropdown menu and select cylinder, this will change the shape of your prim.
Now we need it to look more like a flag pole, so type in these values in the size:
X=0.20
Y=0.20
Z=4.00
We will now color/colour the pole, so click on the Texture tab and click on the white box which has color written underneath, and choice a color for your flag pole :P
I chose a light grey but you can choice whatever you wish. Here are the color co-ordinates if you want use the exact color as mine:
Red:191
Green:191
Blue:191
 Now click on the box which has Texture written underneath and click Blank, this will make the wood texture dissapear and leave you with a solid grey pole. We now want our pole to look more "metal", so we are going click on the drop down of shininess and choose high.
3) Creating The Flag
So to create the flag, we are going to copy our pole and then edit it, so here is how you copy and position it back to its last position...
Make sure you can see your arrows coming out of the pole! If you can't then just simply click on the Edit tab (picture of a sqaure with a cursor over it) on your build menu and that should do it :)
Now hold down Shift and DRAG your prim following the BLUE arrow, so it should go upwards, once it is a few inches up let go and then click ctrl Z. Dont worry! Your copy is still there, it is just in the same place as your pole :) Did I scare you? :P
Now drag it a bit to the right following the Red arrow and go into its General and name it "Flexible Flag".
Now in the Object Tab change the shape to box and put in these values:
X=0.500
Y=0.050
Z=1.000Rotation:
X=0.00
Y=90.00
Z=0.00
 Now when you have created its shape, go into the Texture tab (this is where you can use your imagination :P) and choice absolutly any texture/color you want to use for the flag! I used the one in the library folder called Fabric - tie dye.
When you have picked, drag your flag position just into the pole and near to the top.
We are now ready to make it flexible :P
So go into your Features tab, and click on Flexible Path. You will now see all the settings ready to change (don't panic, I am going show you what each one does ;P)
So here is what you are going to choice:
Maximum is 3, minimum is 0. It is basically the thickness of the prim, and as a flag is very soft, it is best at 3!
Gravity:0.000
Maximum is 10, minimum is -10. This is how much it is pulled upwards or downwards. (Minus numbers pull up, positive numbers pull down)
Drag:0.0
Maximum is 10, minimum is 0. This is basically how long for does the prim drag along before it reaches back to its relevant position (the higher the slower, the lower the quicker)
Wind:10.0
Maximum is 10, minimum is 0. If you want the wind to have an effect on whether the flexible prim moves then the higher the better. If you want the wind to have no effect on it (say if you are wearing a short skirt :P) you would probably want it to low or 0
Tension:5.0
Maximum is 10, minimum is 0. How quick do you want the flag to react to the wind/movement? Well this is what Tension predicts, it also helps control the speed!
The faster you want it, the higher the value! The slower you want it... (you can guess the rest :P)
Force x:0.00
Force Y:0.00
Force Z:0.00
Maximum is 10, minimum is -10. These control in which way you want it to have the most effect, so by tweaking and experimenting with each one you could get some pretty cool effects.
So now you have your flag and you will finally need to link it, so click on any (it doesn't matter which is root) and then hold shift and click on the other, then click Ctrl L, now you will have your flag! Name it what you want then take it into your inventory :)
I hope this tutorial was helpful, if you have any problems or get stuck or confused just leave a comment and I will get back to you asap!
Friday, 27 August 2010
Day 53: Shoe Galore
Who doesn't love learning? Well I am proud to say I do, especially Natalia Zelmanovs tutorials! I have been folowing them for a couple of weeks and have just finished doing the Shoe tutorial and made myself a nice pair of roman sandals :)
She is a true second life goddess for these brillant and fun tutorials! So get yourself in a sandbox and get making :P
http://www.mermaiddiaries.com/
She is a true second life goddess for these brillant and fun tutorials! So get yourself in a sandbox and get making :P
http://www.mermaiddiaries.com/
Thursday, 26 August 2010
Day 52: Color Changing Low Prim Desk!
I have been spending days creating this script! For the next few weeks it is at a Promotion Offer of 2 Lindens!! Enjoy XD
Wednesday, 25 August 2010
Day 51: Learning to Love Scripting!
I am proud to say I have been working very hard with my scripting and can't wait to announce my newest product tomorrow, as I have working all day on this script especially for it :P
But for now here are my latest releases!
Visit My Space: Kuula (226,251,31)
But for now here are my latest releases!
Visit My Space: Kuula (226,251,31)
Tuesday, 24 August 2010
Day 50: Graphic Enhancement Techniques
I don't know if you have noticed, but my pictures have been a bit less up to scratch. Here is an example of what I used to see...
This is mean't to be a circle!
And I am sure my hair isn't mean't to be like this :P
Luckily I managed sort it out! It is really easy to do, to make sure you have the best graphics that your computer can manage go to:
Preferences (CTRL + P) - Graphics -
Now there are two things you can do, put the Quaility and Speed setting to the far right where it says Better.
Also you can change your mesh detail settings to high. (If you only want change the prims to be good quality just change that one)
Here is the difference!
Much better with a lot of detail! Hope this helps :D
Monday, 23 August 2010
Day 49: iLiving Website Now Open
I have now managed to create a website for my store, so you can now keep up to date with what is happening and the latest news. You can view it here at:
http://www.iliving-sl.blogspot.com/
I will also be putting them on here too, but it is optional to where you get your information, plus I can now keep all my latest iLiving information tidy and under one website! :)
Here are my three latest products I now have at my wall in NCI and on xstreet!
(Video instructions coming soon!)
Visit My Wall at NCI: Kuula (225,250,31)
Or
See My Items on xStreet:
https://www.xstreetsl.com/modules.php?name=Marketplace&MerchantID=870291
http://www.iliving-sl.blogspot.com/
I will also be putting them on here too, but it is optional to where you get your information, plus I can now keep all my latest iLiving information tidy and under one website! :)
Here are my three latest products I now have at my wall in NCI and on xstreet!
Visit My Wall at NCI: Kuula (225,250,31)
Or
See My Items on xStreet:
https://www.xstreetsl.com/modules.php?name=Marketplace&MerchantID=870291
Sunday, 22 August 2010
Day 48: Azuchi
I felt like doing a bit of walking today, so I put on my best shoes and came to Azuchi! It covers a whole sim, and is full of detail and character.
The sim really brings you back to the 1500's with its classic yet magical surroundings.
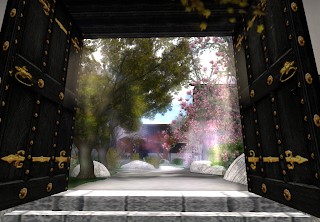 All around are floating petals and single lights glowing through the trees, creating a calm and welcoming atmosphere.
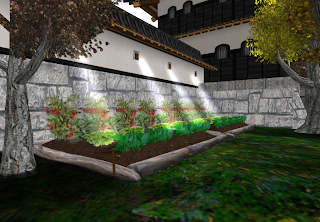 You don't want to miss going down a single path or opening a hidden door, because there are surprises everywhere you go :P
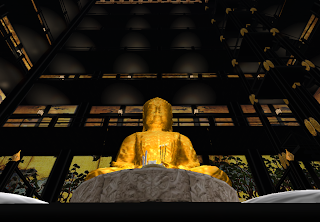 Welcoming you in, you will find this amazing golden statue, standing tall whilst the gigantic, strong walls seem to watch over.
The sim really brings you back to the 1500's with its classic yet magical surroundings.
 All around are floating petals and single lights glowing through the trees, creating a calm and welcoming atmosphere.
 You don't want to miss going down a single path or opening a hidden door, because there are surprises everywhere you go :P
Outside in the main court yard, you will find the stables, where the beautiful horses rest
Also a small market is opposite to get some fresh fruit.
Anyone want a orange? :P
The open Iron house is right next to the horses, which is very handy for when the horses need new shoes :)
Lucky Horses!
I don't know why to be honest I am talking, because the pictures speak for themselves about this place!
Overshadowing this town is the castle, standing tall and proud amongt its home.
 Welcoming you in, you will find this amazing golden statue, standing tall whilst the gigantic, strong walls seem to watch over.
As you go up the stairs you will find yourself peeping around corners and examining the detailed tapestries, until you get to the (near :P) top where you will find yourself around this very grand room filled with rich and vibrant colors. A great place to relax with friends and play a few of the games that surround :)
Want know whats at the very top?
Want to see the other secret locations?
Well.. I don't like to kiss and tell so you will have find them for yourself :P Enjoy!
Visit Azuchi: Azuchi (76,129,63)
Saturday, 21 August 2010
Day 47: Scripting Fumes!
Today I have been playing all day with my scripting skills! As I have been making this new fish pond, but I wanted it to be able do a range of things, so I had to do a bit of editing, cutting and deleting. But, luckily as always I had help from groups :D
This is what I love about second life, there are so many people who are willing to take the time to help others out :)
For this main reason ( and also because I enjoy the feeling of making someone elses day a little brighter :P) I want to help people out, by writing and making video tutorials. I am already half way through my build basics one, and hope to create many more after :)
If you want a specific tutorial doing, just ask and I will see what I can do :D
Friday, 20 August 2010
Day 46: Putting products on XStreet
Yay! Day 2 of my store being open and I have decided to put my items on xstreet, so that you can send them to friends :)
It is very easy to add! All you have to do is buy a magic box from xstreet (for free :D) and then put your items in, then do all the rest on the second life website :)
Thanks to all the advice and help, I managed get my 5 items in there today! Yay! So now they can be gifts aswell as for your own personal luxury :D
Visit my items on XStreet :P
Thursday, 19 August 2010
Day 45: My Build Store iLiving now open!
Wow, I can't believe I have managed get it ready today! As you would have read in my post yesterday, I was photoing them and getting them boxed! Thanks to the NCI Mall I came across, I applied to have a stand there, because avatars under 120 days old can sell their items for free! So I got my stand last night but couldn't get the vendor to work, but this morning I understand how I use it and managed get my 5 items up!
iLiving is the brand name I have chosen for my builds and etc, it stands for internet living, which basically means virtual living :D (I thought iLiving sounded better than vLiving :P)
I am going create a range of furniture, buildings and outside furniture :D
I can't wait to get going!
So here are my 5 items you can find at stand 19 at the NCI Mall :)
Visit My Items :D : Kuula (227,251,31)
Wednesday, 18 August 2010
Day 44: Photographing my Designs!
Thanks to a Torley Video, I have managed to learn how to take good photos of my products. Also I just want say thank you a whole bunch to the group "Gimp Artists of SL" for helping me to design my layout on Gimp! I can't wait to get them up!
I am also looking for somewhere nice and cheap to rent my store, as I don't use buy Lindens, so have to work off what I get.
I have decided that I would have two seperate brands, one for my builds and the other for fashion and beauty! I have managed come up with my name for the builds but that will be revealed later :P
I am just busy right now taking photos off my builds.
I also need to make more clothes! I have only got 1 so far so I will be extremely busy creating designs.
So yeah I have been very veryyy busy today! But I am definatly enjoying this and can't wait till I can get my stuff up :)
Tuesday, 17 August 2010
Day 43: My Future Plans
I have decided that I want to open my own store on here! I enjoy creating buildings and making clothes, so maybe I will have one big store? I haven't planned it out yet, but thought I would share my thoughts. I need also to think of a name for my store so that people will know what to look for when they want to find it. I have created a few things and hope I will be able sell them soon! I am very excited about the idea of it, but need to make further decisions! Night night :)
Monday, 16 August 2010
Day 42: SLArt Community Centre
I have a real fascination with art, it can tell you a lot about the artist, their views and personality on just a plain piece of paper. I have never been to a art exhibition in Second Life and felt that it was probably about time that I viewed one!
I have dressed for the occasion, with this funky art belt :P Where I keep my feltips and crayons :)
This is home to many artists within Second Life, a great place to compare and review the different styles of each independant artist. I do love these designs! They are extremely brillant!
Each room has its own story and theme, I chose to take a picture of a few of my favourate rooms with their designs. I have not taken pictures of art individually for copyright reasons.
I loved this room, full of colourful and very unique paintings.
I really do have a passion for second life photographers, so I had to show you this room! Also these pictures are only 10LS each! Bargain!! :P
In the middle of the mall is this seating area, so its a great place to just relax while you let your camera scroll over the different rooms!
Visit SLArt: Scylla (221,144,66)
Saturday, 14 August 2010
Day 40: Building Basics Part 3
So carrying on from last time, we will be looking at the rest of the object tab. So go ahead and rez a cube and click on the Object Tab.
1) Carrying on with the Object Tab
We left of at the material drop down menu, so now we are going play with Path Cut.
Using Path Cut B, change it from 0.000 to 0.255 and Path Cut E to 0.750.
You will see that this cuts throught the prim from the center, and that you can control it by being able to pathcut both clockwise and anticlockwise using the Path Cut B and E. Once you have had a bit of a practise with that, set the Path Cut Setting of B back to 0.000, and E to 1.000.
This is what it should look like.
Yep you guessed it, it creates a hole in the prim :P
By increasing and decreasing you can control how big or small you want the hole to be.
Now LEAVE the hollow at 90, because we are going need it for the next bit.
Underneath Hollow, you will see hollow shape with a drop down menu. From the list you choice what shape you want the hole to be! So click on circle, and now your hole should look like this...
Now change hollow back to 0.00.
Now change the settings of both Twists back to 0.
Okay, now using taper, redo these settings
X: 0.60 & Y: 0.60
This option will cut the opposite ends diagonally, so you can create vars and jars! :P
Reset both setting back to 0 again!
The Top Shear allows you to *bend* the prim, so they look like they are leaning!
Change your Top Shear settings to:
X: 0.50 & Y:-0.50 (Make sure you note the MINUS sign)
This is what it will look like! Looks like it is about to topple over :P
And for the very last time, reset your settings back to 0
Finally! Last but never least! Is Slice, this will cut through the prim just as if you were cutting cheese, as it will get smaller and smaller!
So change it to:
B:0.600 & E:0.900
You will see through doing this that you can cut from both bottom and top!
That is ALL of the Object Section Covered! You should now have a go at randomly changing the settings of each object, because by messing around you will find great opportunities for building in the future! So experiment like crazy and just have fun with it! :D
1) Carrying on with the Object Tab
We left of at the material drop down menu, so now we are going play with Path Cut.
Using Path Cut B, change it from 0.000 to 0.255 and Path Cut E to 0.750.
You will see that this cuts throught the prim from the center, and that you can control it by being able to pathcut both clockwise and anticlockwise using the Path Cut B and E. Once you have had a bit of a practise with that, set the Path Cut Setting of B back to 0.000, and E to 1.000.
This is what it should look like.
Yep you guessed it, it creates a hole in the prim :P
By increasing and decreasing you can control how big or small you want the hole to be.
Now LEAVE the hollow at 90, because we are going need it for the next bit.
Underneath Hollow, you will see hollow shape with a drop down menu. From the list you choice what shape you want the hole to be! So click on circle, and now your hole should look like this...
Now change hollow back to 0.00.
Twist B: -90 (note the MINUS sign) & E: 90
This as you can see twists the box, to make some pretty cool shapes!Now change the settings of both Twists back to 0.
Okay, now using taper, redo these settings
X: 0.60 & Y: 0.60
This option will cut the opposite ends diagonally, so you can create vars and jars! :P
Reset both setting back to 0 again!
The Top Shear allows you to *bend* the prim, so they look like they are leaning!
Change your Top Shear settings to:
X: 0.50 & Y:-0.50 (Make sure you note the MINUS sign)
This is what it will look like! Looks like it is about to topple over :P
And for the very last time, reset your settings back to 0
Finally! Last but never least! Is Slice, this will cut through the prim just as if you were cutting cheese, as it will get smaller and smaller!
So change it to:
B:0.600 & E:0.900
You will see through doing this that you can cut from both bottom and top!
That is ALL of the Object Section Covered! You should now have a go at randomly changing the settings of each object, because by messing around you will find great opportunities for building in the future! So experiment like crazy and just have fun with it! :D
Subscribe to:
Comments (Atom)


